Installation
This section provides guides for getting setup with Meltano.
Free Hosted Meltano Dashboards
In November, we released Meltano as a free hosted product! This eliminates the hosting and installation hassle with a concierge-style setup so you can start building dashboards faster.
Fill out this form to get started with a free hosted Meltano account. We will contact you to schedule a setup time and learn everything we can about your needs.
Get started with your free hosted Meltano dashboard
Self Hosted Solutions
For instructions on how to setup your own Meltano instance, check out:
DigitalOcean Marketplace
DigitalOcean provides a simple container for spinning up a server where Meltano can be deployed to the Cloud. Install the Meltano 1-Click App in the DigitalOcean Marketplace
Get $50 Worth of DigitalOcean Credits for Free
When you create a new DigitalOcean account using this link (which contains our referral code) you will receive $50 of free credit over 30 days.
Please note, at times the Meltano version on DigitalOcean may be slightly behind the current PyPi version.
Video Walkthrough
Step-by-Step Instructions
Select
Create Meltano DropletIf you are not logged in already, you will be asked to login, or create a new DigitalOcean account
By default, your droplet will come with the following settings that you can customize if desired
- Image: Meltano
- Plan: Starter - Standard
- $40/mo (8GB / 4 CPUs, 160 GB / SSD disk, 5 TB transfer)
- Datacenter: A default datacenter region (depending your location)
- Number of Droplets: 1 Droplet
- Backups: Not enabled by default
Add authentication to your droplet via SSH
Click
Create Droplet
Once your Droplet is created, it will have its own IP address displayed in the DigitalOcean user interface.
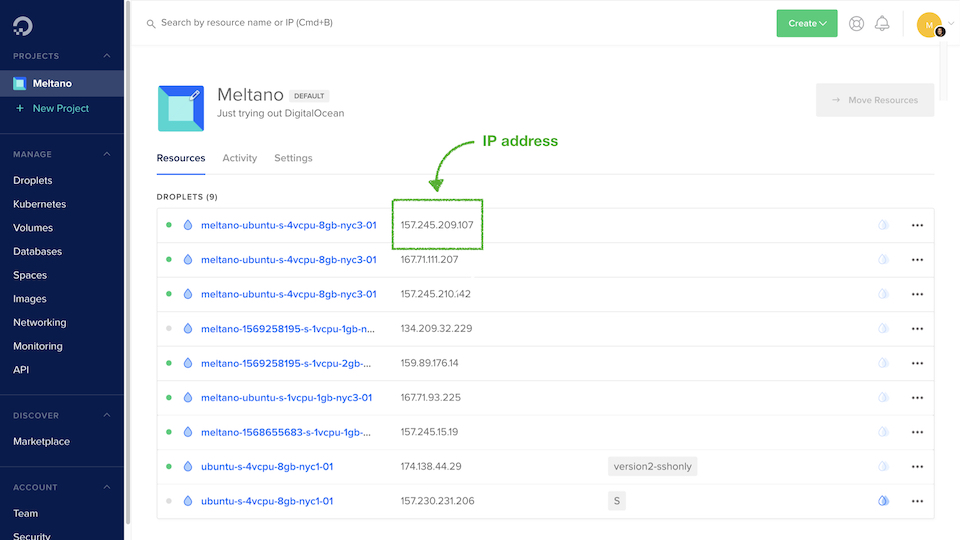
- Visit your Meltano instance at port 5000, like so:
http://{YOUR_IP_ADDRESS}:5000
Now that you've got your Meltano instance up and running, visit our Getting Started Guide to connect some data sources and start building your data pipelines and dashboards!
Build a Custom Meltano Droplet on DigitalOcean
Looking to customize your DigitalOcean Droplet build and configuration? Please follow the instructions in our Advanced Tutorial: Manually Creating a DigitalOcean Droplet.
Amazon Web Services (AWS)
Prerequisites
This guide assumes that you have a functioning Docker image where your Meltano project is already bundled with the Meltano installation. To track this issue, follow meltano#624.
In this section, we will be going over how you can deploy a Meltano Docker image to AWS.
Setting Up Elastic Container Service (ECS)
- Login to AWS Console
- Search for ECS and click on the link
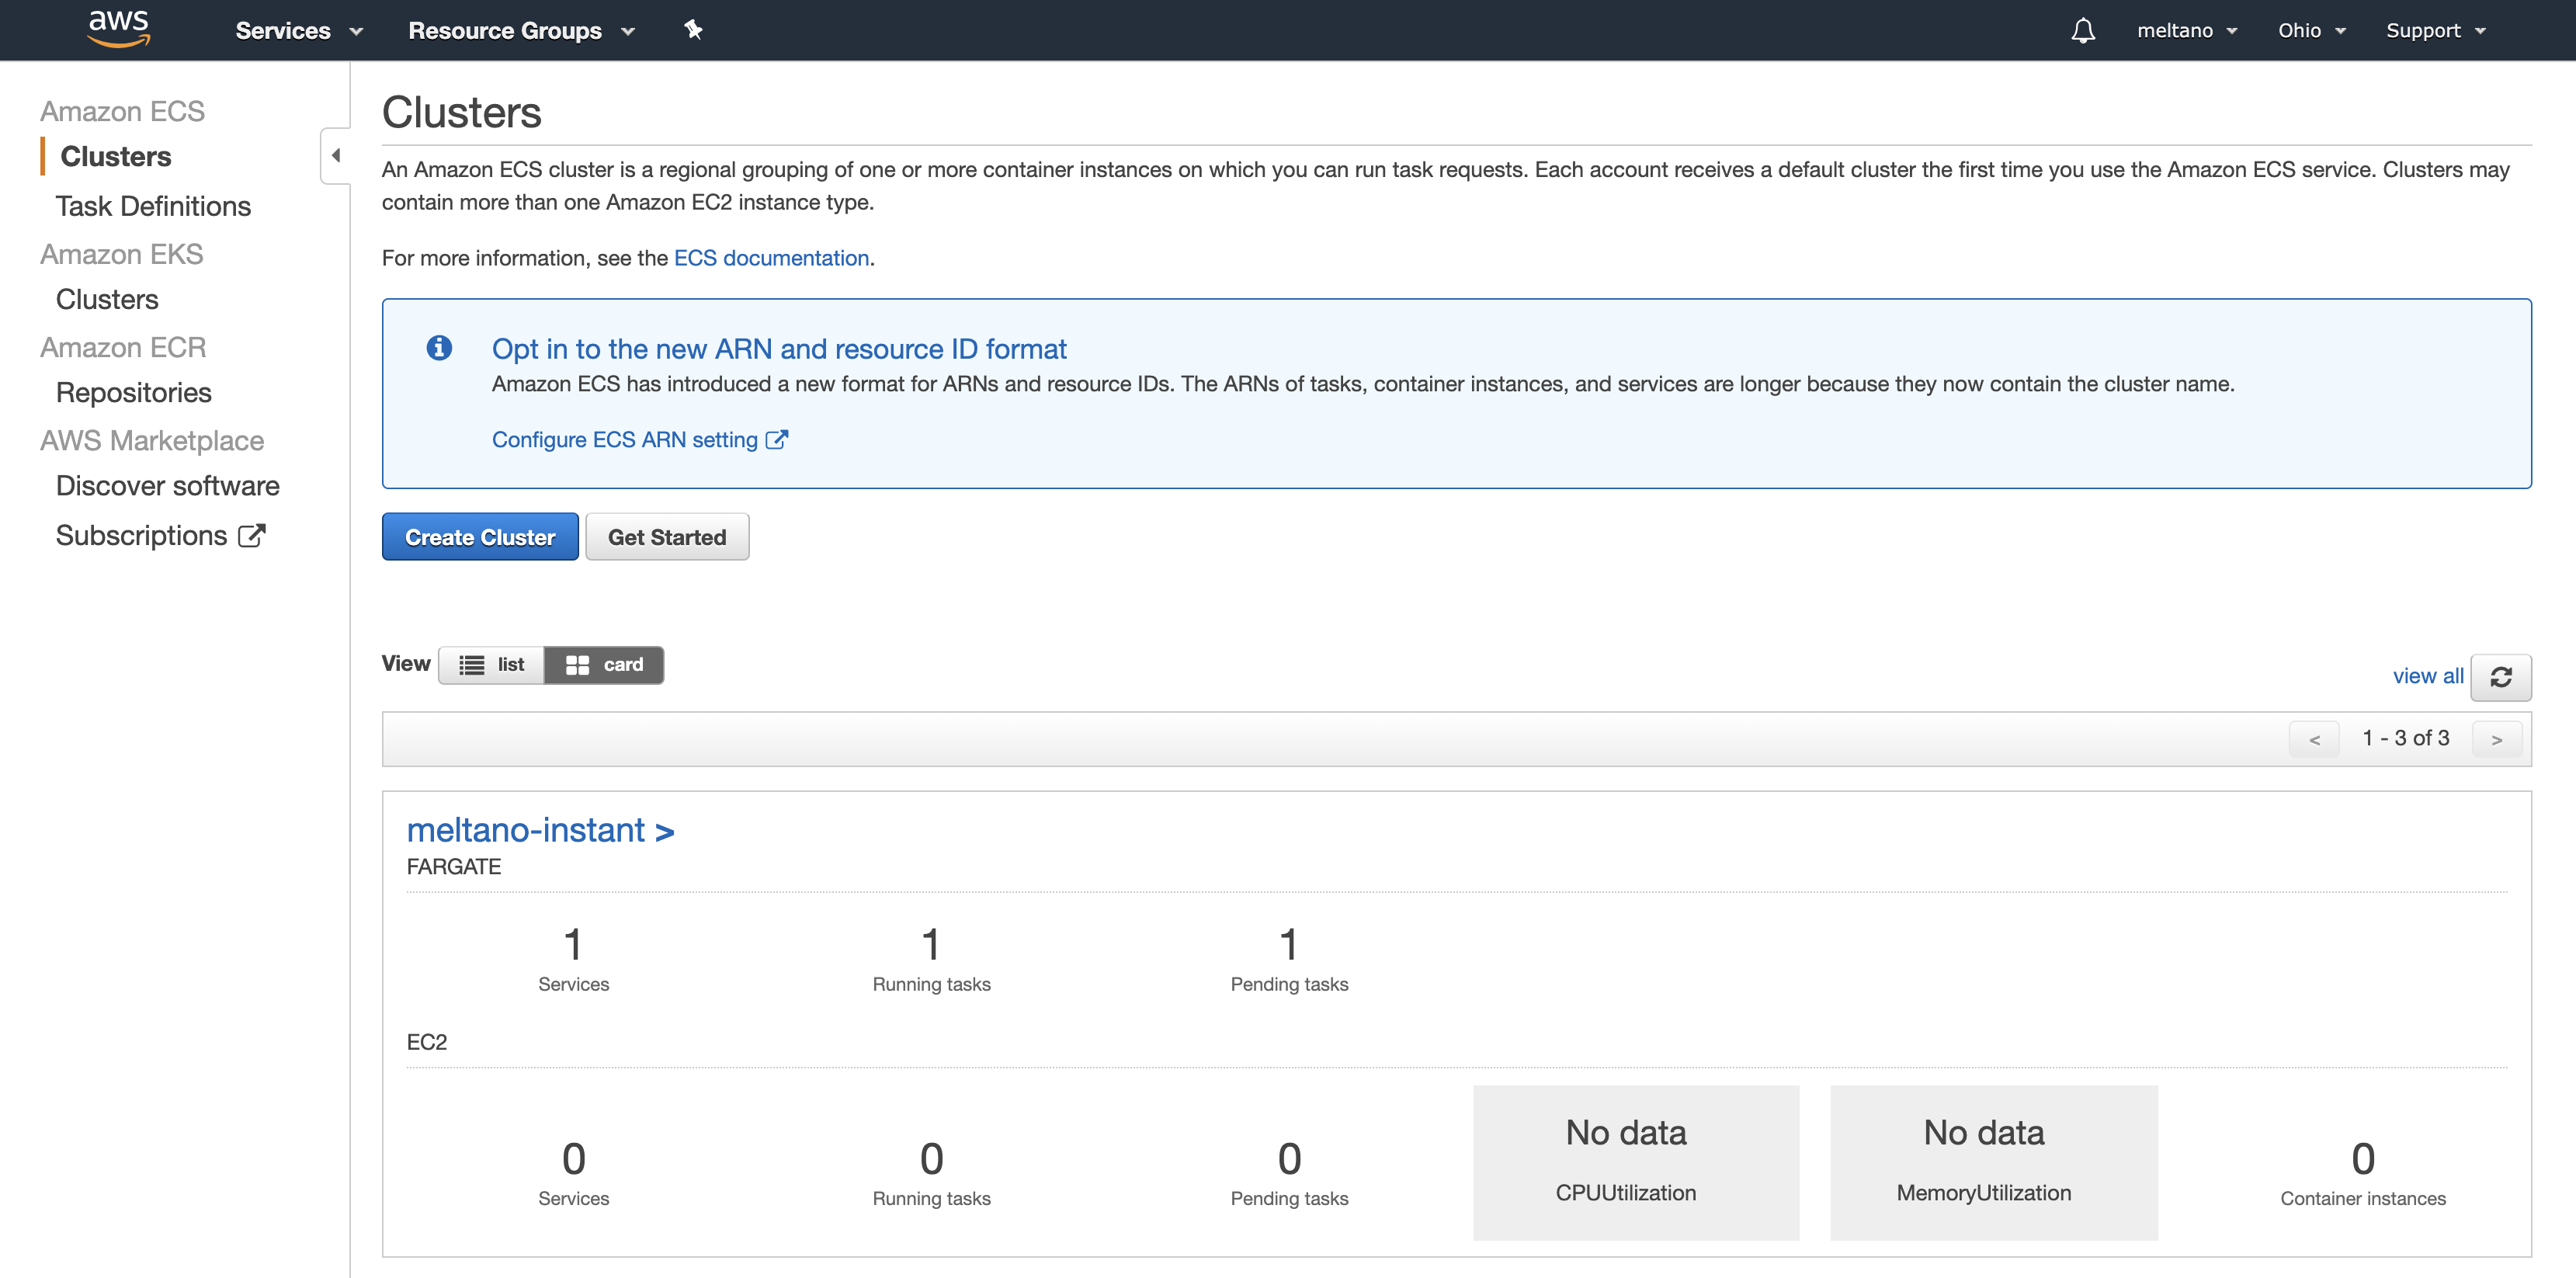
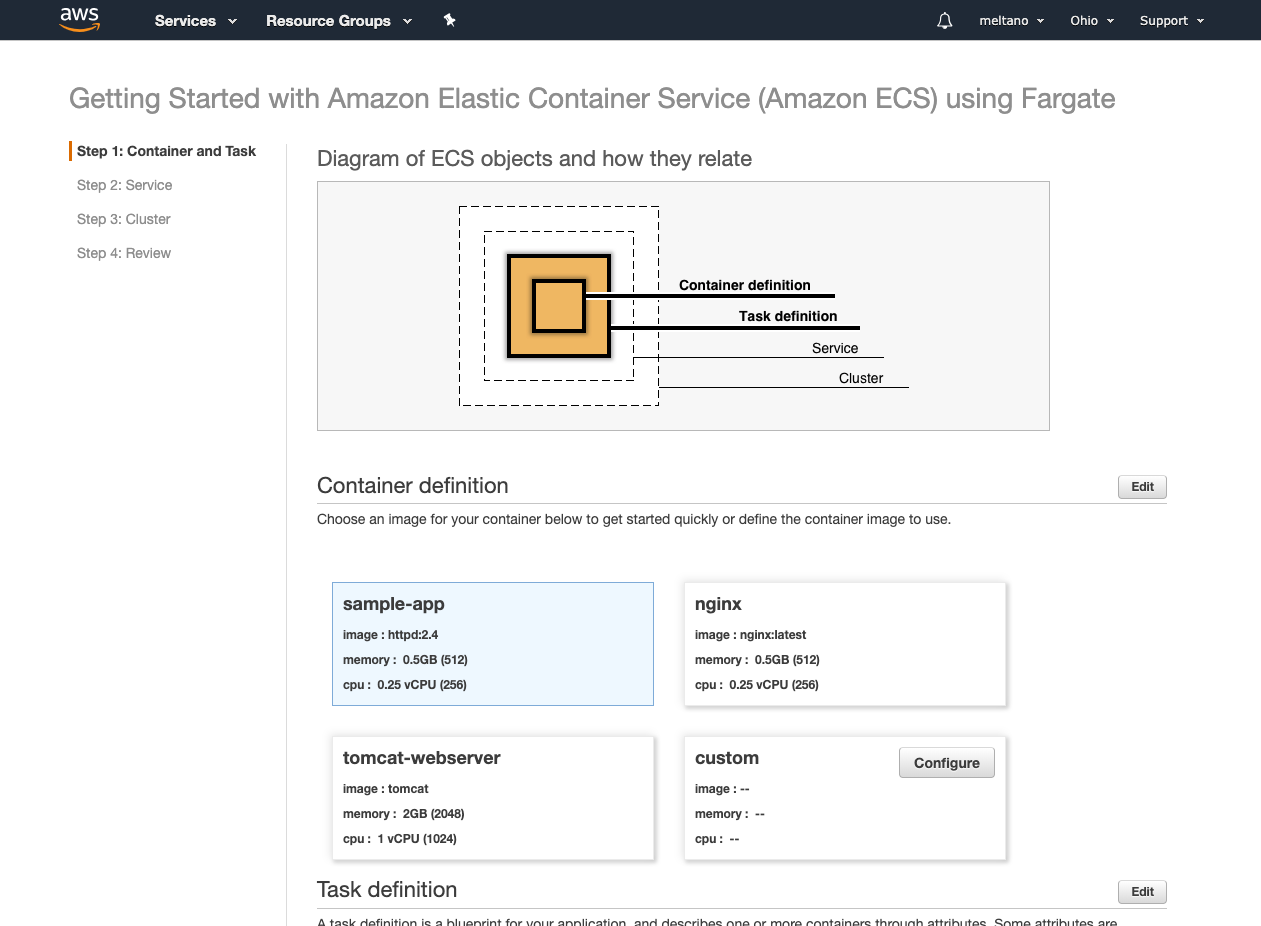
- We will create a new Container definition by clicking on the
Configurebutton in the custom card - Fill out the form with the following data:
- Container name: Meltano
- Image: YOUR_DOCKER_IMAGE_URL
- Examples:
- docker.io/namespace/image-name:tag
- registry.gitlab.com/namespace/project/image-name:tag
- Examples:
- Memory Limits (MiB): Soft limit 1024
- Port mappings:
- 5000/tcp (meltano)
- Click
Updatebutton to finish setting up your container defintion - Click
Editnext to the Task defintion heading - Update the form with the following:
- Task definition name: meltano-run
- Network mode: awsvpc
- Task execution role: ecsTaskExecutionRole
- Compatibilities: FARGATE
- Task memory: 1GB (1024)
- Task CPU: 0.25 vCPU (256)
- Click
Nextto move to the next step
Review service properties
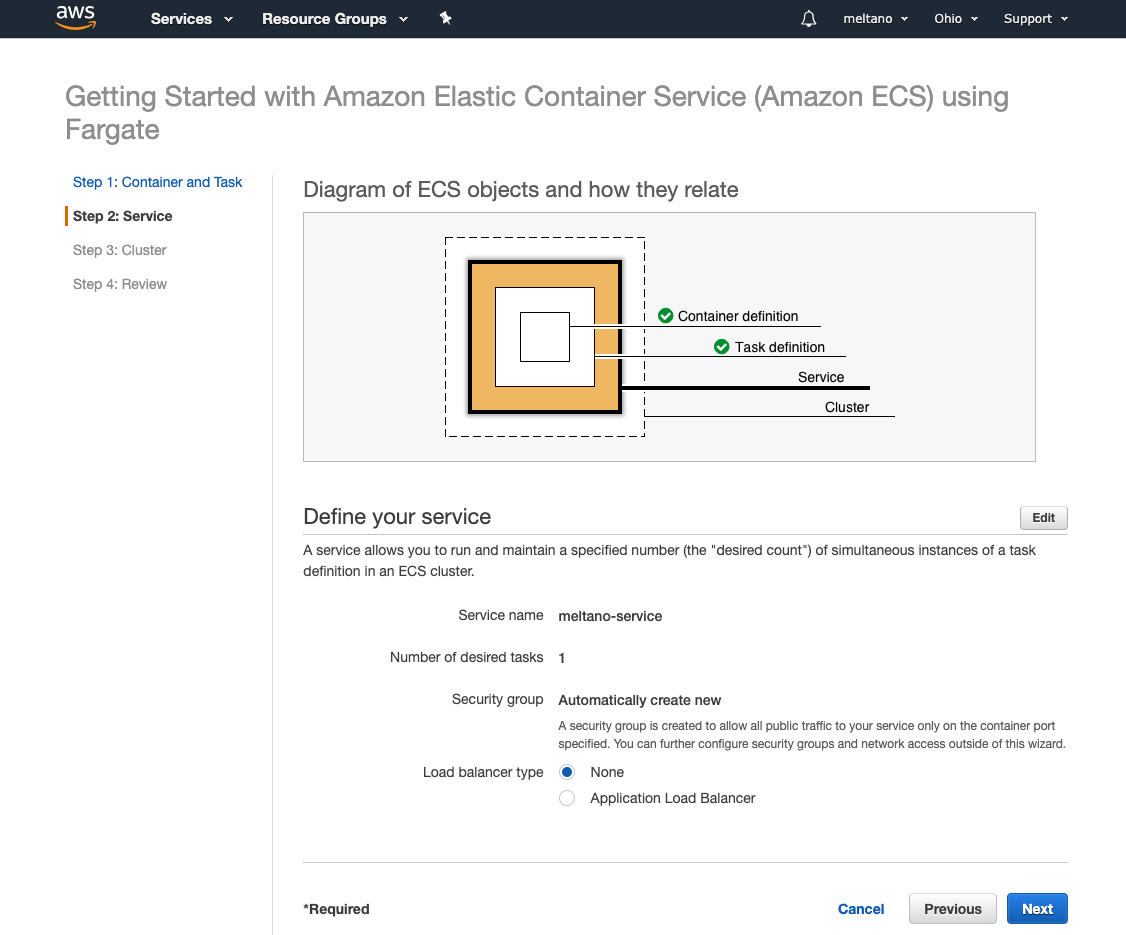
- Verify that the properties are as follows:
- Service name: meltano-service
- Number of desired tasks: 1
- Security group: Automatically create new
- Load balancer type: None
- Click
Nextto move on to the next step
Configure Your Cluster
The main configuration here is the Cluster name. We provide a suggestion below, but feel free to name it as you wish.
- Cluster name: meltano-cluster
- VPC ID: Automatically create new
- Subnets: Automatically create new
Review Cluster Configuration
After you click Next, you will have the opportunity to review all of the properties that you set. Once you confirm that the settings are correct, click Create to setup your ECS.
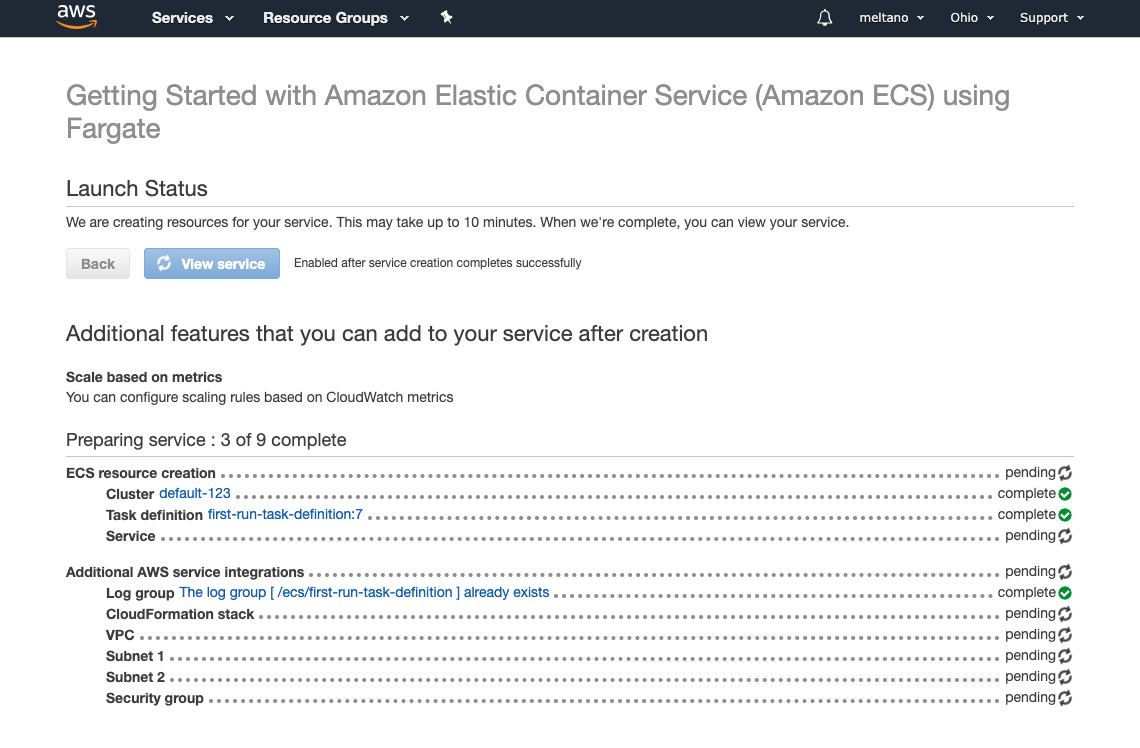
You should now see a page where Amazon prepares the services we configured. There will be spinning icons on the right of each service that will live update as it finished. Once you see everything has setup properly, you're cluster has been successfully deployed!
Final steps
- Open the page with your cluster
- Click on the Tasks tab
- You should see a task that has a status of
RUNNINGfor Last Status - Click on the Task ID link (e.g., 0b35dea-3ca..)
- Under Network, you can find the URL for your instance under Public IP (e.g., 18.18.134.18)
- Open a new tab in your browser and visit this new URL on port 5000 (e.g., http://18.18.134.18:5000)
TIP
The IP address can be mapped to a domain using Route53. We will be writing up a guide on how to do this. You can follow along at meltano#625.
Configure network access
TIP
This section is only necessary if you do not have a Security Group that allows for port 5000,5010 inbound.
Once you complete the cluster setup, you should be brought to the detail page for the service. You should be default on a tab called Details with a Network Access section.
- Navigate to the Details tab
- Under Network Access, click on the link next to Security Groups (e.g., sg-f0dj093dkjf10)
- This should open a new tab with your security group
- Navigate to the Inbound Rules tab on the bottom of the page
- Click
Edit Rules - Delete any existing rules
- Click
Add Rulewith the following properties:
- Type: Custom TCP Rule
- Protocol: TCP
- Port Range: 5000
- Source: Custom 0.0.0.0/0
- Click "Add Rule" with the following properties:
- Type: Custom TCP Rule
- Protocol: TCP
- Port Range: 5010
- Source: Custom 0.0.0.0/0
- Click
Save rules
Local Installation
In this section, we will install Meltano as an application you can access locally from your browser and on the command line. If you prefer to install to Docker, please view the installation instructions here.
TIP
We do not have a double click installer at this time, but it is on our roadmap and we will be sure to update this page when we do!
Requirements
Before you install Meltano, make sure you have the following requirements installed and up to date.
Unix-like environment
Recent versions of Linux and macOS are both fully supported, but Windows is not.
If you'd like to run Meltano on Windows, you can install it inside the Windows Subsystem for Linux (WSL). You may also try installing Meltano on Docker, although Docker on Windows is known to have some idiosyncrasies that might hinder Meltano's ability to function.
Python 3+
TIP
You may refer to https://realpython.com/installing-python/ for platform specific installation instructions.
To check if you have the correct Python version, open your terminal and use the following commands to check the version:
python --version
If you've installed Python 3, but are not getting the result you expect, you may have installed Python 3 alongside an existing Python 2 installation. In this case, please use python3 and pip3 wherever this guide refers to the python and pip commands.
pip
pip is a package installer that comes automatically with Python 3+. This is also what we will be using to install Meltano. Here are some commands related to pip that may be of interest:
# Check for current version of pip
# to ensure that it is using the Python3 pip
pip --version

# Update pip
pip install --upgrade pip
Virtual Environment
IMPORTANT
Unless you are building a Docker image, it is strongly recommended that Meltano be installed inside a virtual environment in order to avoid potential system conflicts that may be difficult to debug.
Why use a virtual environment?
Your local environment may use a different version of Python or other dependencies that are difficult to manage. The virtual environment provides a "clean" space to work without these issues.
Recommended Virtual Environment Setup
We suggest you create a directory where you want your virtual environments to be saved (e.g. .venv/). This can be any directory in your environment, but we recommend saving it in your Meltano project to make it easier to keep track of.
Then create a new virtual environment inside that directory:
mkdir .venv
python -m venv .venv/meltano
Activating Your Virtual Environment
Activate the virtual environment using:
source .venv/meltano/bin/activate
If the virtual environment was activated successfully, you'll see a (meltano) indicator added to your prompt.
TIP
Once a virtual environment is activated, it stays active until the current shell is closed. In a new shell, you must re-activate the virtual environment before interacting with the meltano command that will be installed in the next step.
To streamline this process, you can define a shell alias that'll be easier to remember than the entire activation invocation:
# Add to `~/.bashrc`, `~/.zshrc`, etc, depending on the shell you use:
alias meltano!="source $MELTANO_PROJECT_PATH/.venv/meltano/bin/activate"

# Use as follows, after creating a new shell:
meltano!
You can deactivate a virtual environment by typing deactivate in your shell.
Install Meltano
Now that you have your virtual environment set up and running, run the following command to install the Meltano package:
pip install meltano
Once the installation completes, you can check if it was successful by running:
meltano --version
That's it! Meltano is now be available for you to use.
Now that you have successfully installed Meltano and its requirements, you can create your first project.
Create your first project
To initialize a new project, open your terminal and navigate to the directory that you'd like to store your Meltano projects in.
Next, to create your project, you will use the meltano init command which takes a PROJECT_NAME that is of your own choosing. For this guide, let's create a project called "carbon."
Meltano shares anonymous usage data with the team through Google Analytics. This is used to help us learn about how Meltano is being used to ensure that we are making Meltano even more useful to our users.
If you would prefer to use Meltano without sending the team this data, learn how to configure this through our environment variables docs.
meltano init carbon
This will create a new directory named carbon and initialize Meltano's basic directory structure inside it.
Inside the Meltano project directory, all plugin configuration (which may include tokens and passwords) is stored inside the .meltano directory,
which is automatically added to the project's .gitignore file to prevent this potentially sensitive information from accidentally being pushed up to a hosted Git repository.
Start the application
Now that you've created your first Meltano project, let's change directory to our new project and start Meltano UI:
cd carbon
meltano ui
Meltano is now running and should open a new tab at http://localhost:5000.
You are now ready to add data sources, configure reporting databases, schedule updates and build dashboards!
Installing on Docker
Docker is an alternative installation option to using a virtual environment to run Meltano. To use these instructions you will need to install Docker onto your computer and have it running when you execute the commands below.
Using Pre-built Docker Images
We provide the meltano/meltano docker image with Meltano pre-installed and ready to use.
Note: The meltano/meltano docker image is also available in GitLab's registry:
registry.gitlab.com
This image contains everything you need to get started with Meltano.
# download or update to the latest version
docker pull meltano/meltano

# look the currently installed version
docker run meltano/meltano --version
Initialize Your Project
Once you have Docker installed, running, and have pulled the pre-built image you can use Meltano just as you would in our Getting Started Guide. However, the command line syntax is slightly different. For example, let's create a new Meltano project:
docker run -v $(pwd):/projects \
             -w /projects \
             meltano/meltano init YOUR_PROJECT_NAME
Then you can cd into your new project:
cd YOUR_PROJECT_NAME
We can then start the Meltano UI. Since ui is the default command, we can omit it.
docker run -v $(pwd):/project \
             -w /project \
             -p 5000:5000 \
             meltano/meltano
You can now visit http://localhost:5000 to access the Meltano UI.
If you are a Meltano end-user who is not going to be contributing code to our open source repository, you should be able to use Meltano entirely from the UI at this point.
Follow the steps in our Getting Started Guide to get started.
For Contributors: Example Command Line Syntax for Docker
Here are some example of CLI commands you may need to run if you are working with Meltano as an open source contributor:
Running the ELT from the Command Line
To run the ELT and extract some data from the tap-carbon-intensity into target-sqlite:
docker run -v $(pwd):/project \
             -w /project \
             meltano/meltano elt tap-carbon-intensity target-sqlite
Adding a Model from the Command Line
Now that we have data in your database, let's add the corresponding model bundle as the basis of our analysis.
docker run -v $(pwd):/project \
             -w /project \
             meltano/meltano add model model-carbon-intensity-sqlite
Upgrading Meltano
We release a new version of Meltano every week. To keep tabs on the latest releases, follow along on the Meltano blog, or have a look at our CHANGELOG.
Using Meltano UI
When an update is available, you will be informed of this automatically through a shiny blue button in the top right corner of Meltano UI:

Clicking this button will show more information and give you the option to install the update right away:

The Meltano UI will refresh automatically once installation is complete.
Using the command line
If you're not using Meltano UI, you can update Meltano to the latest version by running the following command in your terminal:
meltano upgrade
Troubleshooting
Are you having installation or deployment problems? We are here to help you. Check out Getting Help on the different ways to get in touch with us.